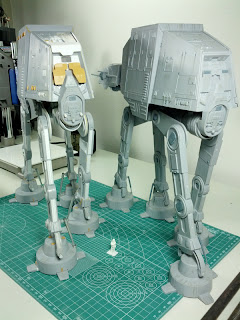
Revell AT-AT
October 2010
Revell AT-AT inside my Spraybooth with the modified parts.
A much improved feet.
New joints were scratchbuilt to follow the filming model.
Hip joints were thickened and...
...still working on the ankle joints.
 |
| Finally finished all four legs! (Nov. 15,2011) |
 |
| Rear Drive Motor still in progress... |
 |
| ...so is the front motor. |
 |
| The curves and the hump were created using Tamiya Epoxy Putty. |
I can tear down my AT-AT for safer transit to a competition.
Check out the videos of this model...
Next. On to the head ... In 2013!!
Look to the right, then left and down.
Finished the framework for the neck on first week of December 2012.
The frame is detachable. Just to give me some room for improvement.
The frame connect to the body via turn key. Then a bigger magnet
from the frame to the head.
As you can see. The head is still in the "drawing board".
Drawing up the formwork for the head. I hope, I can start
cutting this patterns early January next year.
Big thanks to Baloo at The Replica Forum
for sharing his drawing.
January 2013!!!
And here we go again...
Like in an actual building construction.
I prepared the formwork for aligning all the panels
during assembly.
This is the first piece for the head. This will be the
structural connection to the neck
and will be attached by 4 magnets.
The horizontal "bar" is now in placed
on the formwork. Next to do is the back wall.
January 25, 2013
Back wall finished.
Just few more sanding to smoothen the cut edges.
May 1, 2013. Time really flies.
Can't believe those round "thingy" took me awhile to build.
Spent more time on sanding it to smooth. But just cannot get it to be perfect.
So I moved on...
July 14,2013
The head is coming along nicely. Here's a comparison
from Revell to MPC then to my scratchbuilt head.
February 9,2014
The replacement head is still in KIV due to a lot of work in the office.
Anyway, here how it looks like now...
Now back to the drawing board for the bottom details and guns.
May 28,2015
I can't believed this project is taking me so long. Almost an arm reach to the finish line.
But I'm shelving this for awhile. I want to do some painting, and I have almost forgotten
the joy of painting a model. This project will be back.
July 06,2016
Well, after few weeks of communicating with Tony from Shapeways.
I finally received the chin gun.
Check it out...


